- Published on
Install Tailscale on Proxmox
I needed a reliable method to access my Proxmox server and the services running on it while away from home. There were times I wanted to check on data I had stored in it, push a quick update to a container, or troubleshoot an issue. Without remote access, even small tasks had to wait until I got home, which wasn't always practical.
In this guide, I'll show you how I installed Tailscale on Proxmox using an LXC container, running on my HP T610 thin client.
Tailscale is a simple, secure mesh VPN built on WireGuard that lets you easily access your Proxmox server and home network from anywhere, without complex configuration. It's an ideal solution for homelab remote access because it works across devices, is easy to manage, and keeps your connections private.
Install Tailscale on LXC Container or on the Proxmox Host
The topic of whether to install Tailscale directly on the Proxmox host, inside a VM, or inside an LXC container is highly debated online. While some users opt for host installation due to its simplicity and direct integration, others and community discussions discourage this approach (see 1, 2), citing potential security risks and maintenance complexity. Installing Tailscale in an unprivileged LXC container is often recommended instead, as it isolates the service from the host and reduces the attack surface.
I chose to install Tailscale on an LXC container. The steps are easy and not complicated to follow.
My Setup
Before we begin, let me describe my homelab setup. This information will be useful when setting up the LXC container and running Tailscale.
Creating the LXC Container
First, we'll create a dedicated LXC container for Tailscale. Click on the "Create CT" button in the Proxmox web interface to start the container creation wizard. Set a suitable hostname, such as tailscale, and set the root password for the container.
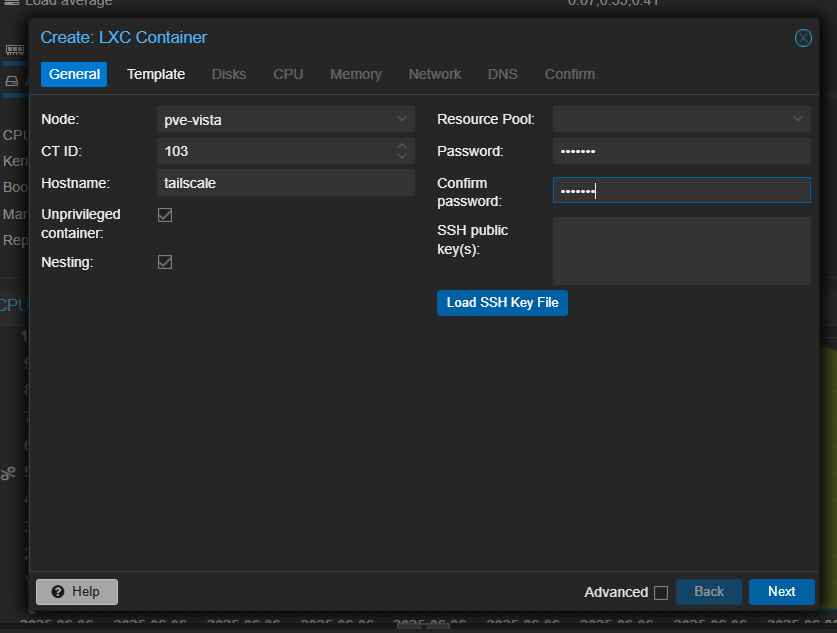
Note the ID of the CT you are creating, as we will need it later. For this guide, I will use 103 as the container ID. Click "Next" to proceed.
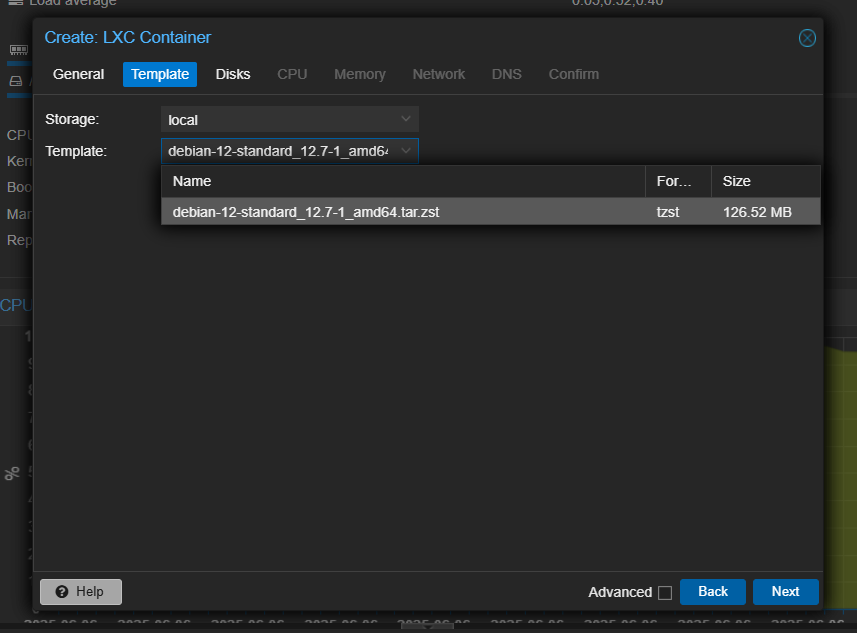
For the CT template, I chose the Debian 12 standard template that comes with Proxmox.
For Disk, CPU & Memory settings, I used the following configuration:
- Disk: 3GB (2GB is also sufficient)
- CPU: 1 core
- Memory: 512 MB
In the network section, I set the IPv4 to DHCP for automatic IP assignment, which will be changed later in the tutorial. The rest of the network settings were left as default.
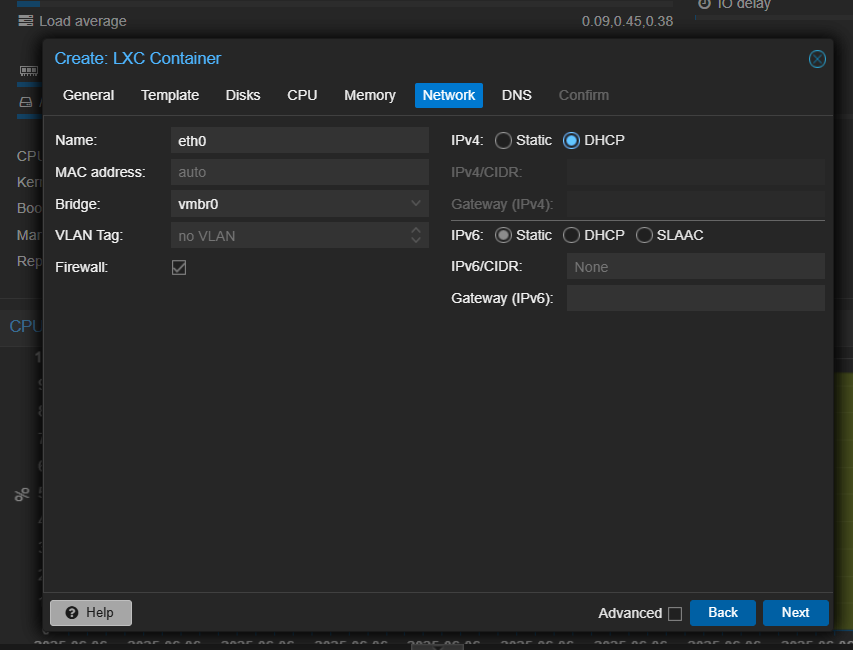
The DNS section can be left as default.
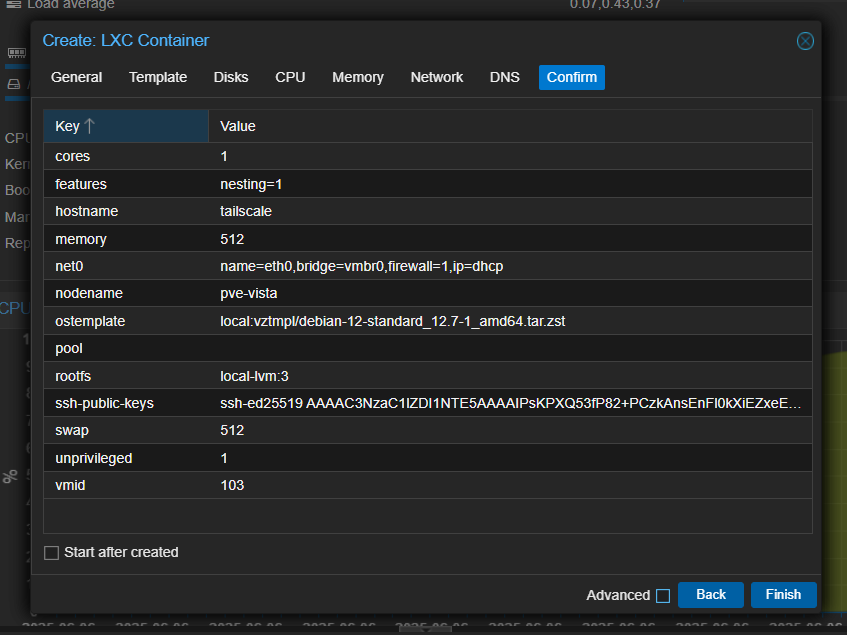
Below is the config summary of the LXC container to be created. Uncheck the "Start at boot" option for now, as we will start the container after further configuring it. Click on "Finish" to create the container.
Allow Access to Networking Resources
Unprivileged LXC containers cannot use the /dev/tun device by default, which Tailscale needs to create secure network tunnels. To make Tailscale work in your container, you need to update its configuration to allow access to /dev/tun.
Open the configuration file (run this on the Proxmox host terminal, replace 103 with your LXC container ID):
nano /etc/pve/lxc/103.conf
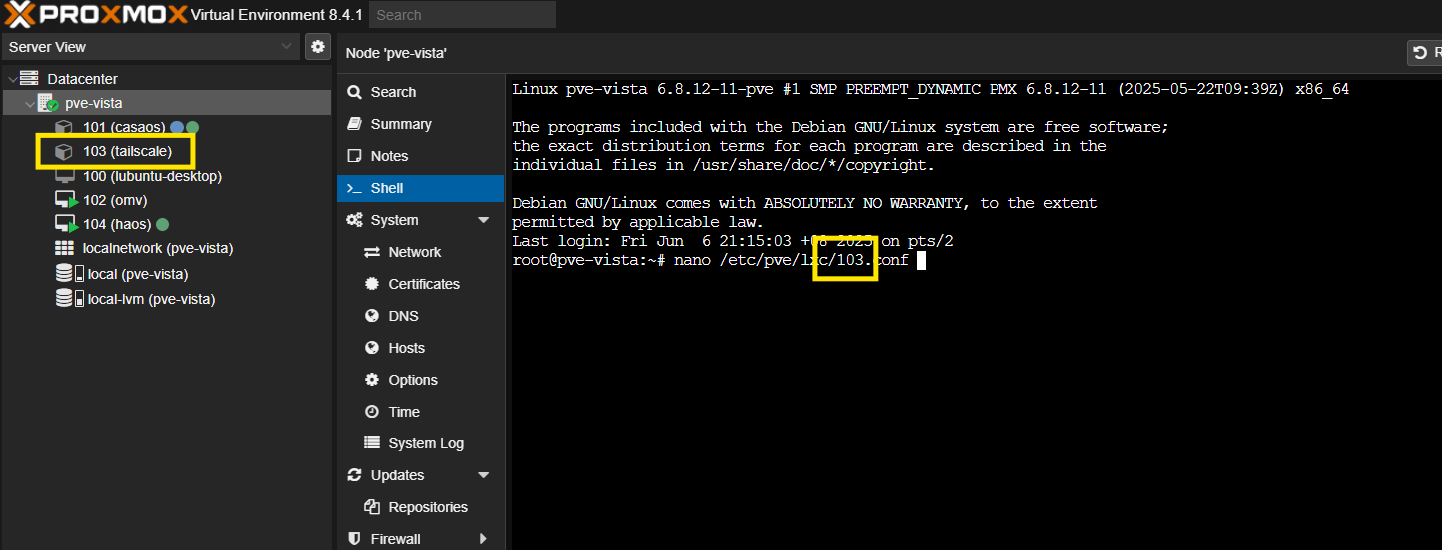
Then, add the following lines to the file:
lxc.cgroup2.devices.allow: c 10:200 rwm
lxc.mount.entry: /dev/net/tun dev/net/tun none bind,create=file
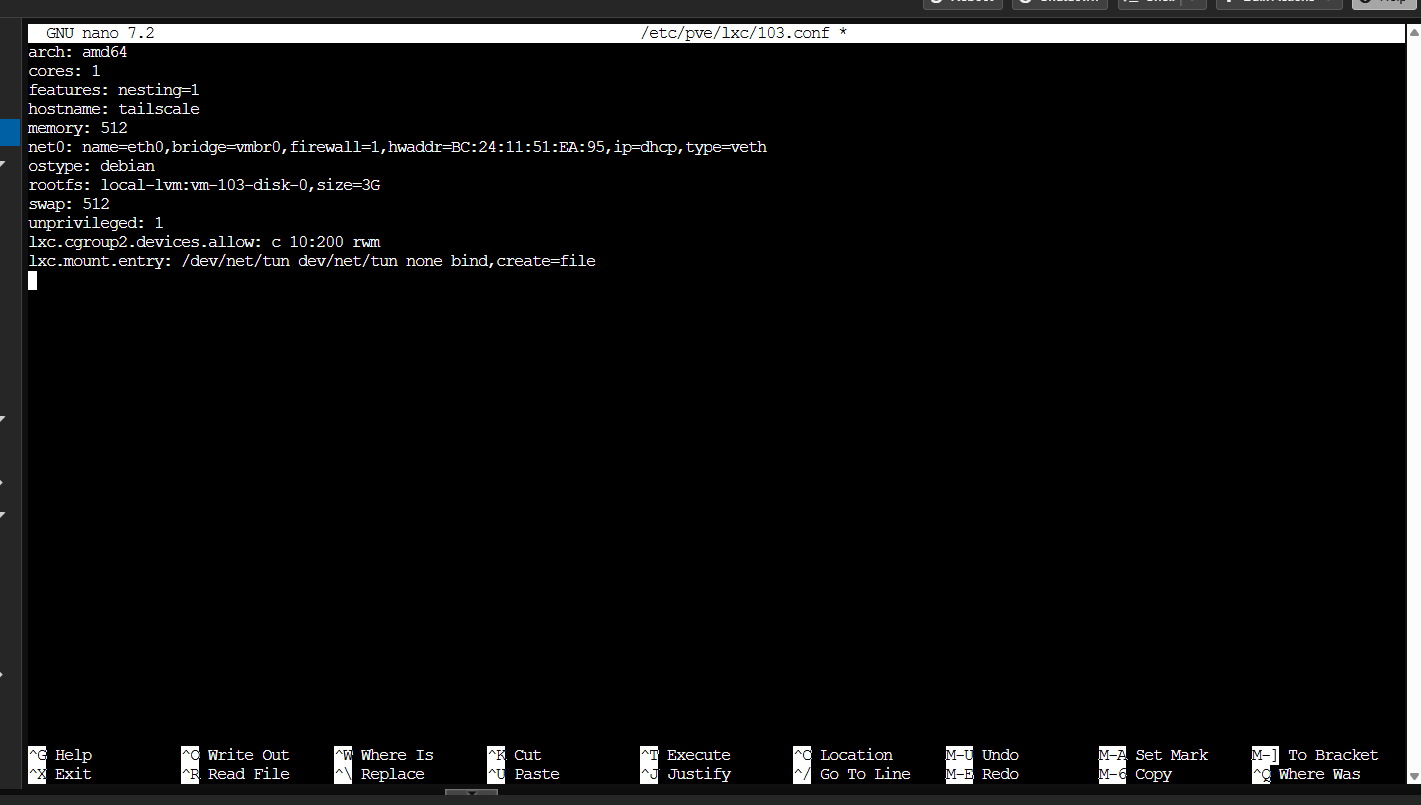
Save the file, and now you can start the container. If the LXC is already running, it will need to be shut down and started again for this change to take effect.
Container Initial Setup
Open your LXC container console.
note
For the rest of this guide, the commands displayed are meant to be run inside the LXC container console. You can access the console from the Proxmox web interface by selecting the container and clicking on "Console".
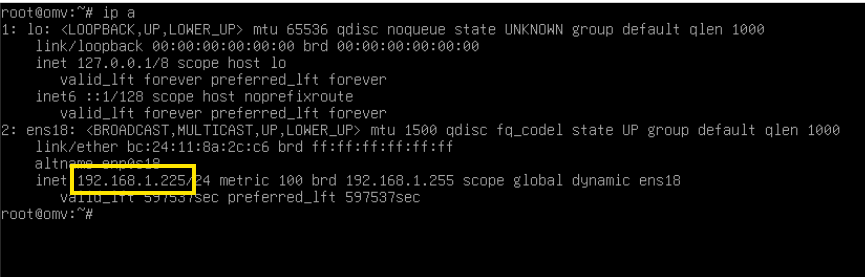
First, determine the IP address that is assigned to the container.
ip -a
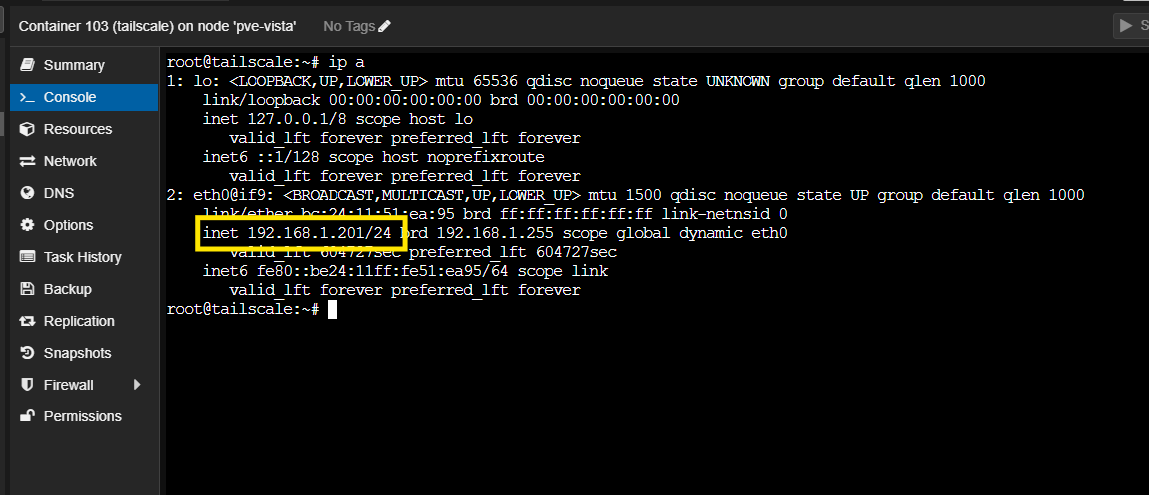
Then, update the container options with the IP address. Change DHCP to Static and fill in the IP address found in the command output & Gateway IP of your setup.
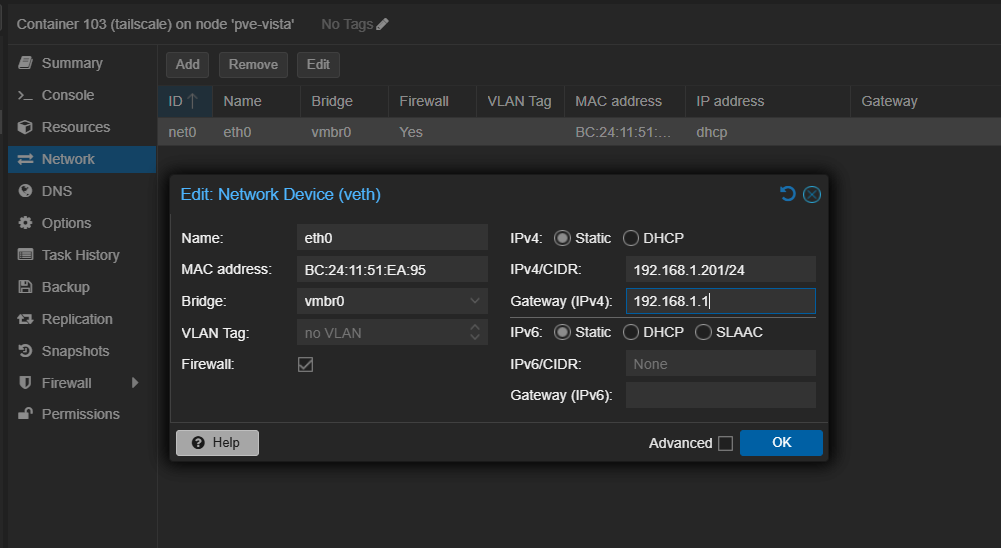
Click "OK" to save the changes. The changes should take effect immediately; no need to restart the container.
You can check if the network setup is working by pinging any public domain, e.g., ping 1.1.1.1.
After that, return to the console and update the system packages:
apt update && apt upgrade -y
Then, install curl and sudo:
apt install curl sudo -y
While it is not strictly necessary to install sudo as we are already running as root, the Tailscale documentation often includes sudo in the commands, so it is much faster to copy & paste the commands without manually deleting the keyword sudo.
Install & Configure Tailscale
Run the command below to install Tailscale in your LXC container:
curl -fsSL https://tailscale.com/install.sh | sh
We will configure Tailscale as a subnet router, which allows devices on your Tailscale network to access your local network through this container. This is particularly useful for accessing your Proxmox host and other devices on your home network.
From Tailscale docs:
Subnet routers let you extend your Tailscale network (known as a tailnet) to include devices that don't or can't run the Tailscale client. They act as gateways between your tailnet and physical subnets, enabling secure access to legacy devices, entire networks, or services without installing Tailscale everywhere.
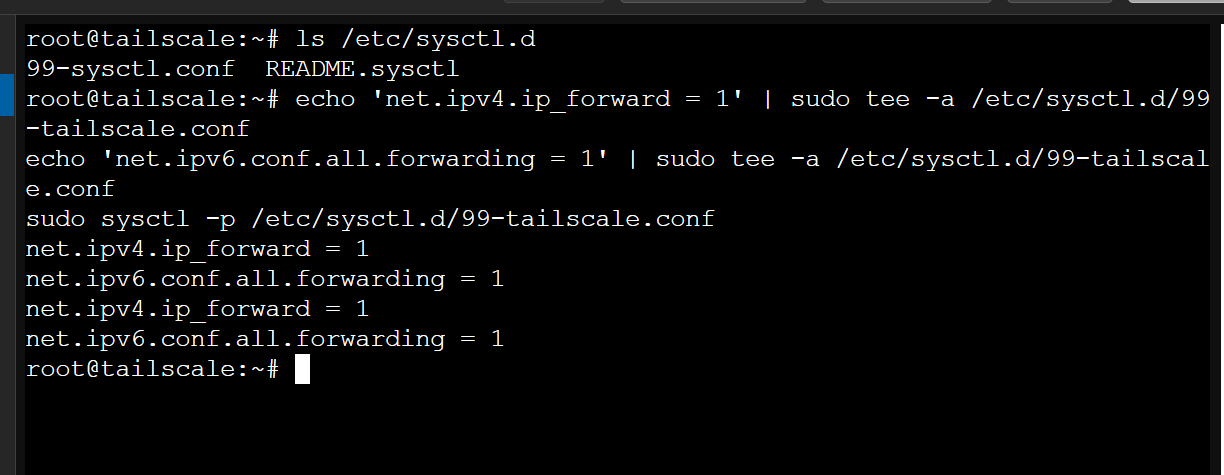
In the CT console, run the following commands to allow IP forwarding, which is required for subnet routing:
echo 'net.ipv4.ip_forward = 1' | sudo tee -a /etc/sysctl.d/99-tailscale.conf
echo 'net.ipv6.conf.all.forwarding = 1' | sudo tee -a /etc/sysctl.d/99-tailscale.conf
sudo sysctl -p /etc/sysctl.d/99-tailscale.conf
We are almost done. Now we can start Tailscale and advertise your local network routes.
tailscale up --advertise-routes=192.168.1.0/24 --advertise-exit-node
Replace the IP 192.168.1.0/24 with your gateway subnet, changing the last octet to 0. You can omit the --advertise-exit-node flag, but I would like to advertise this node as an exit node.
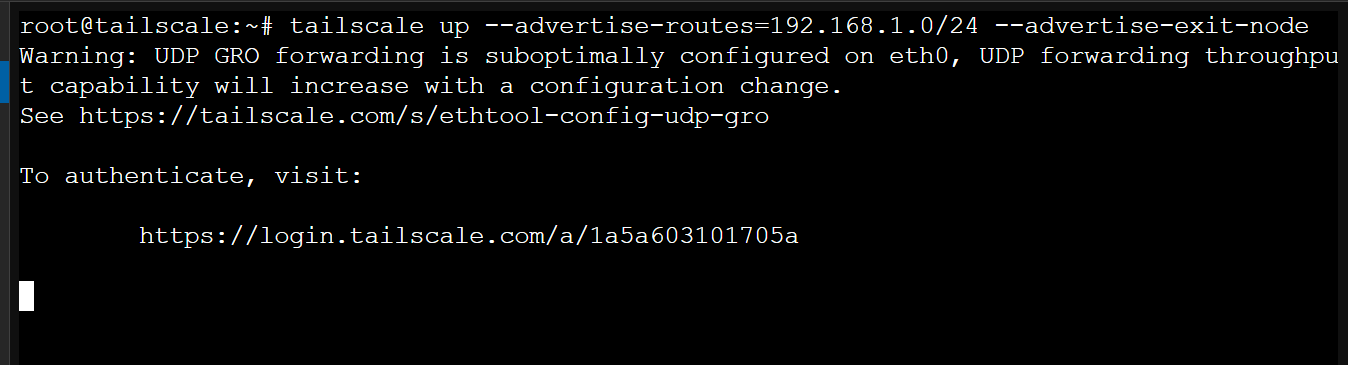
You should be prompted to authenticate your Tailscale account. Follow the link given to authenticate yourself. It will output "SUCCESS" once you have successfully authenticated.
Now, if you open your Tailscale Admin Dashboard, you should see your device listed.

But if you notice, the "Subnets" & "Exit Node" chips are not yet approved (as shown by the exclamation icon). Tailscale requires you to manually approve subnet routes and exit nodes for security reasons. Click on the three dots next to the device name and select "Edit Routes".

Approve the changes by checking the "Subnet routes" and "Exit Node" options, then click "Save".
Optionally, you can disable key expiry so that your Tailscale connection remains active without needing to re-authenticate frequently.
Accessing Proxmox Remotely
Now for the interesting part. Install Tailscale on your device, e.g., smartphone or laptop, and turn it on. By now, you should be able to access your Proxmox web interface using its IP as if you were on your home network (by 'home network', I mean devices connected to the same Wi-Fi/LAN).
To test this out, use another device connected to a network other than your home network (e.g., mobile data or a different Wi-Fi). Connect to Tailscale on that device.
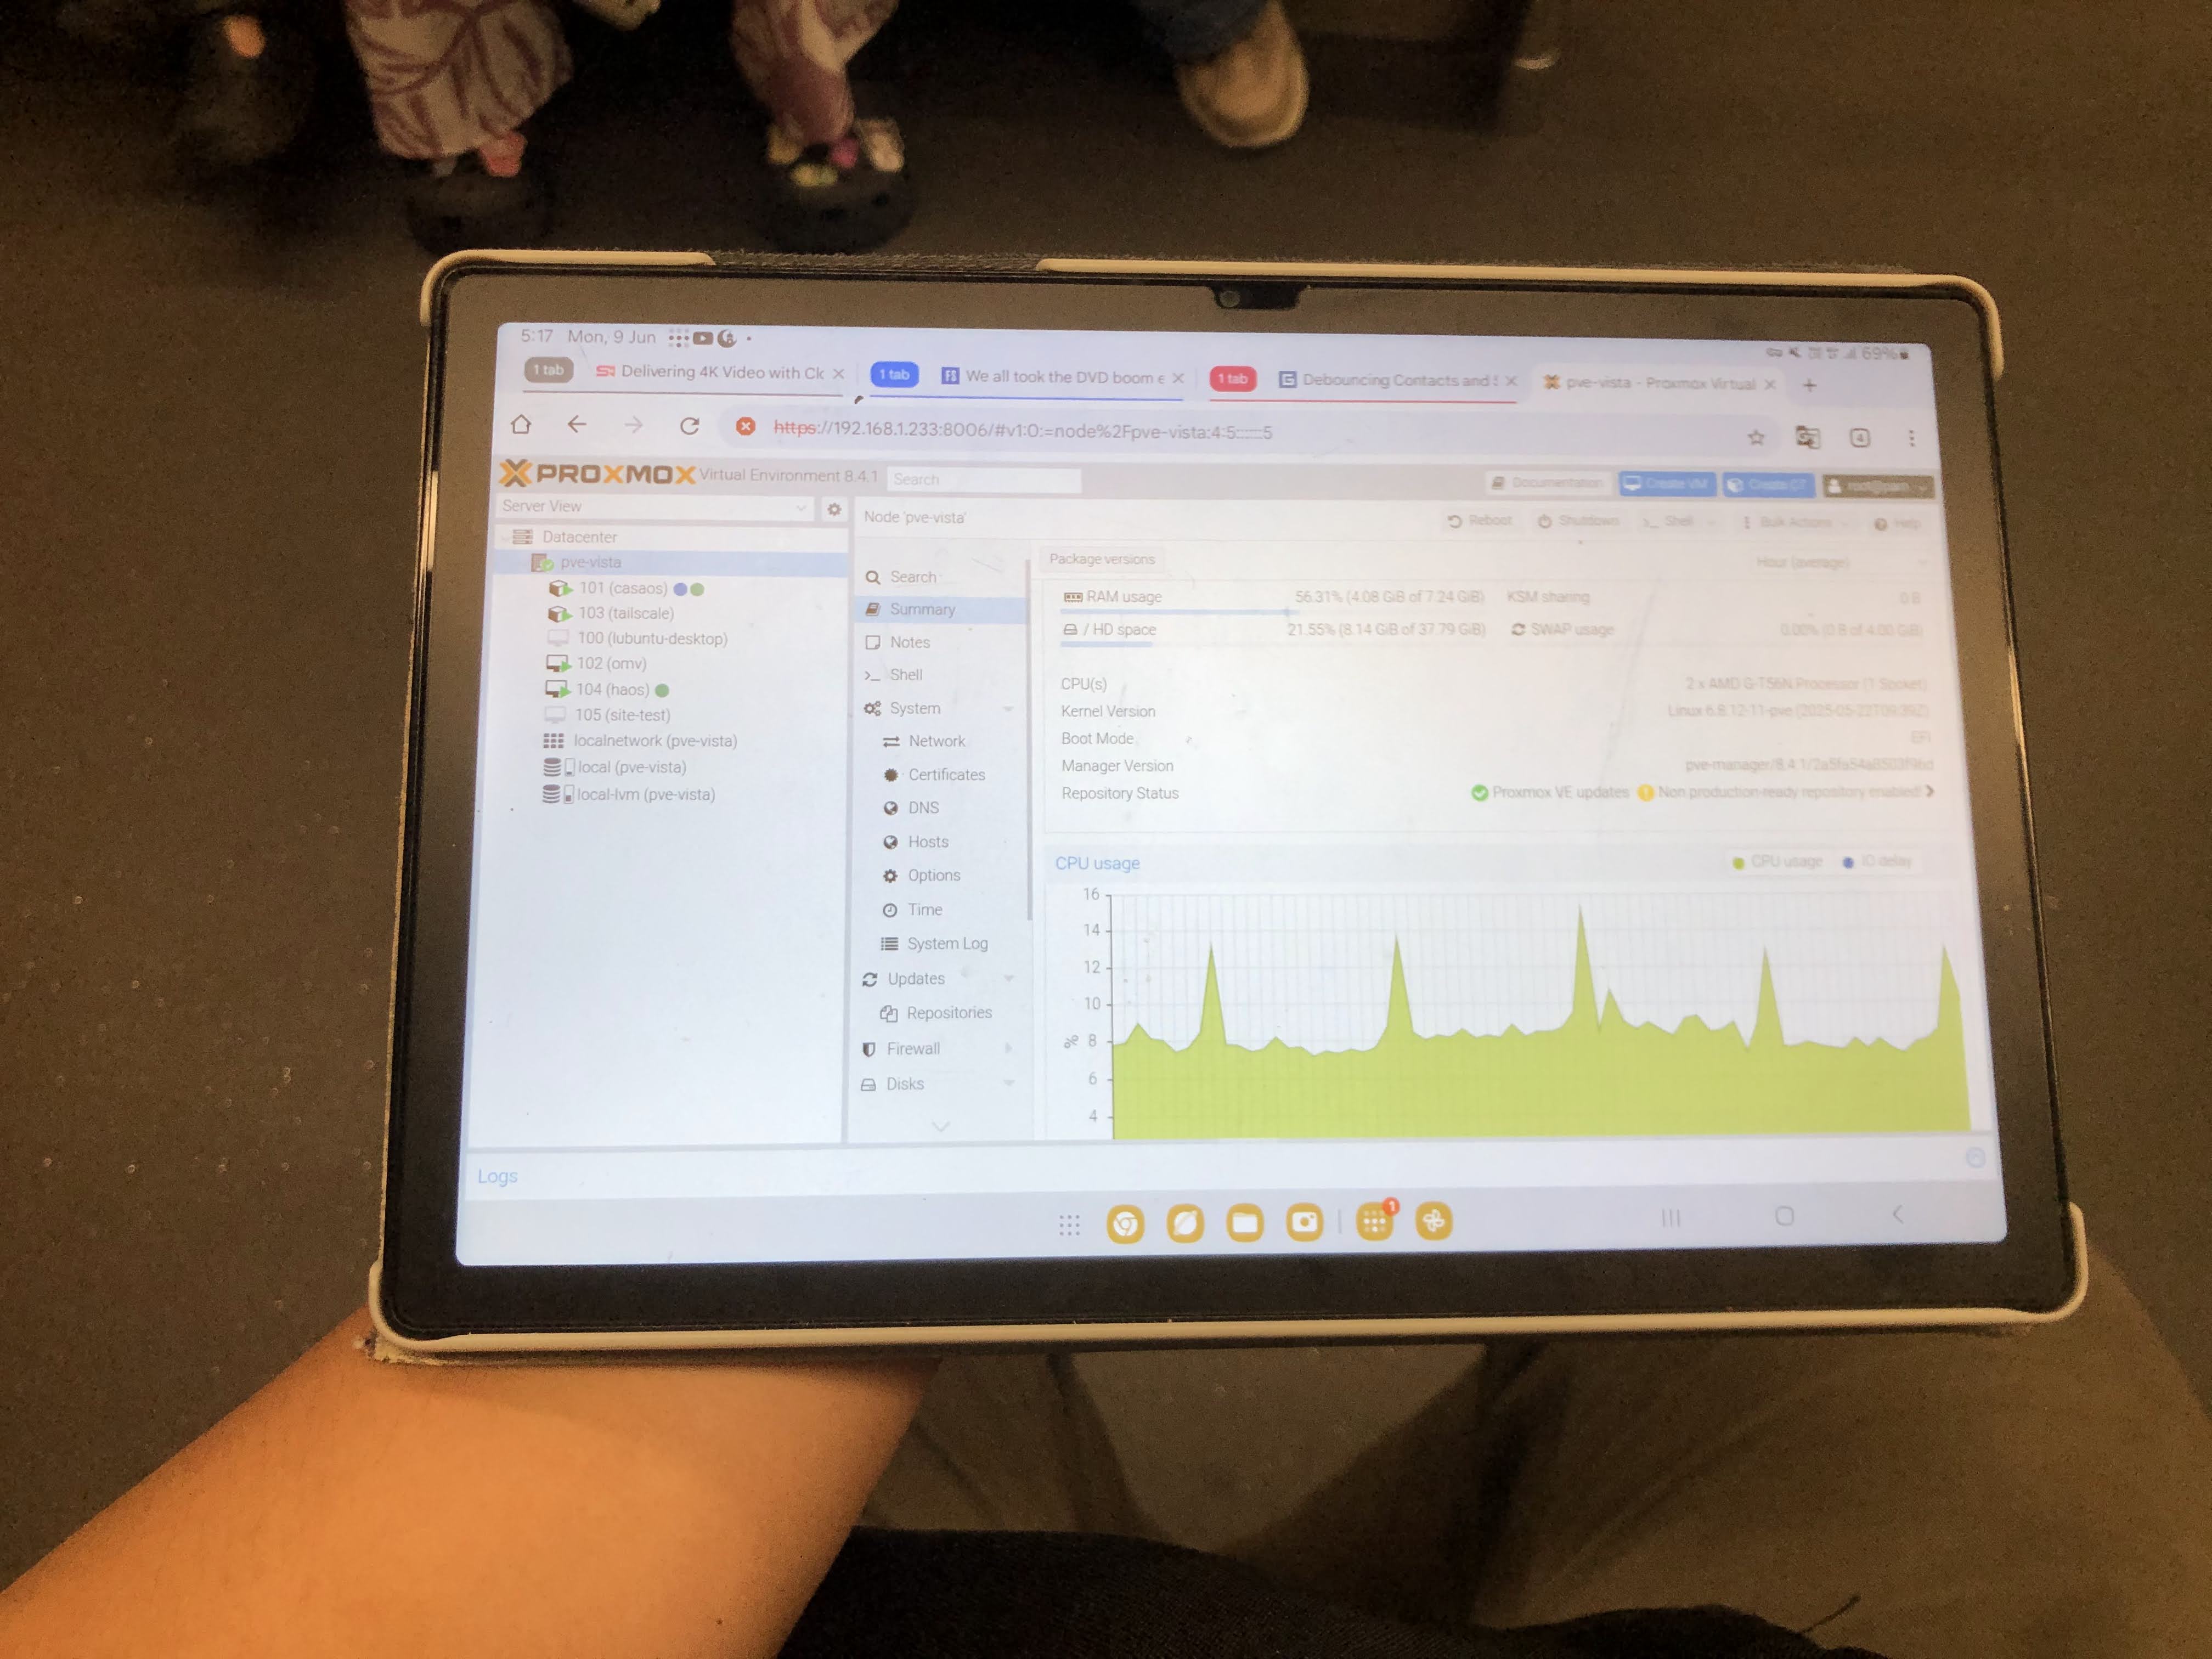
Normally, without Tailscale, just on the home network, I would access my Proxmox via https://192.168.1.233:8006. Now, on that test device, go to the same IP and you should be able to access your Proxmox web interface! Here I'm in an LRT on my way home after work.
Not just Proxmox, but other services on that server too! Here is Home Assistant.
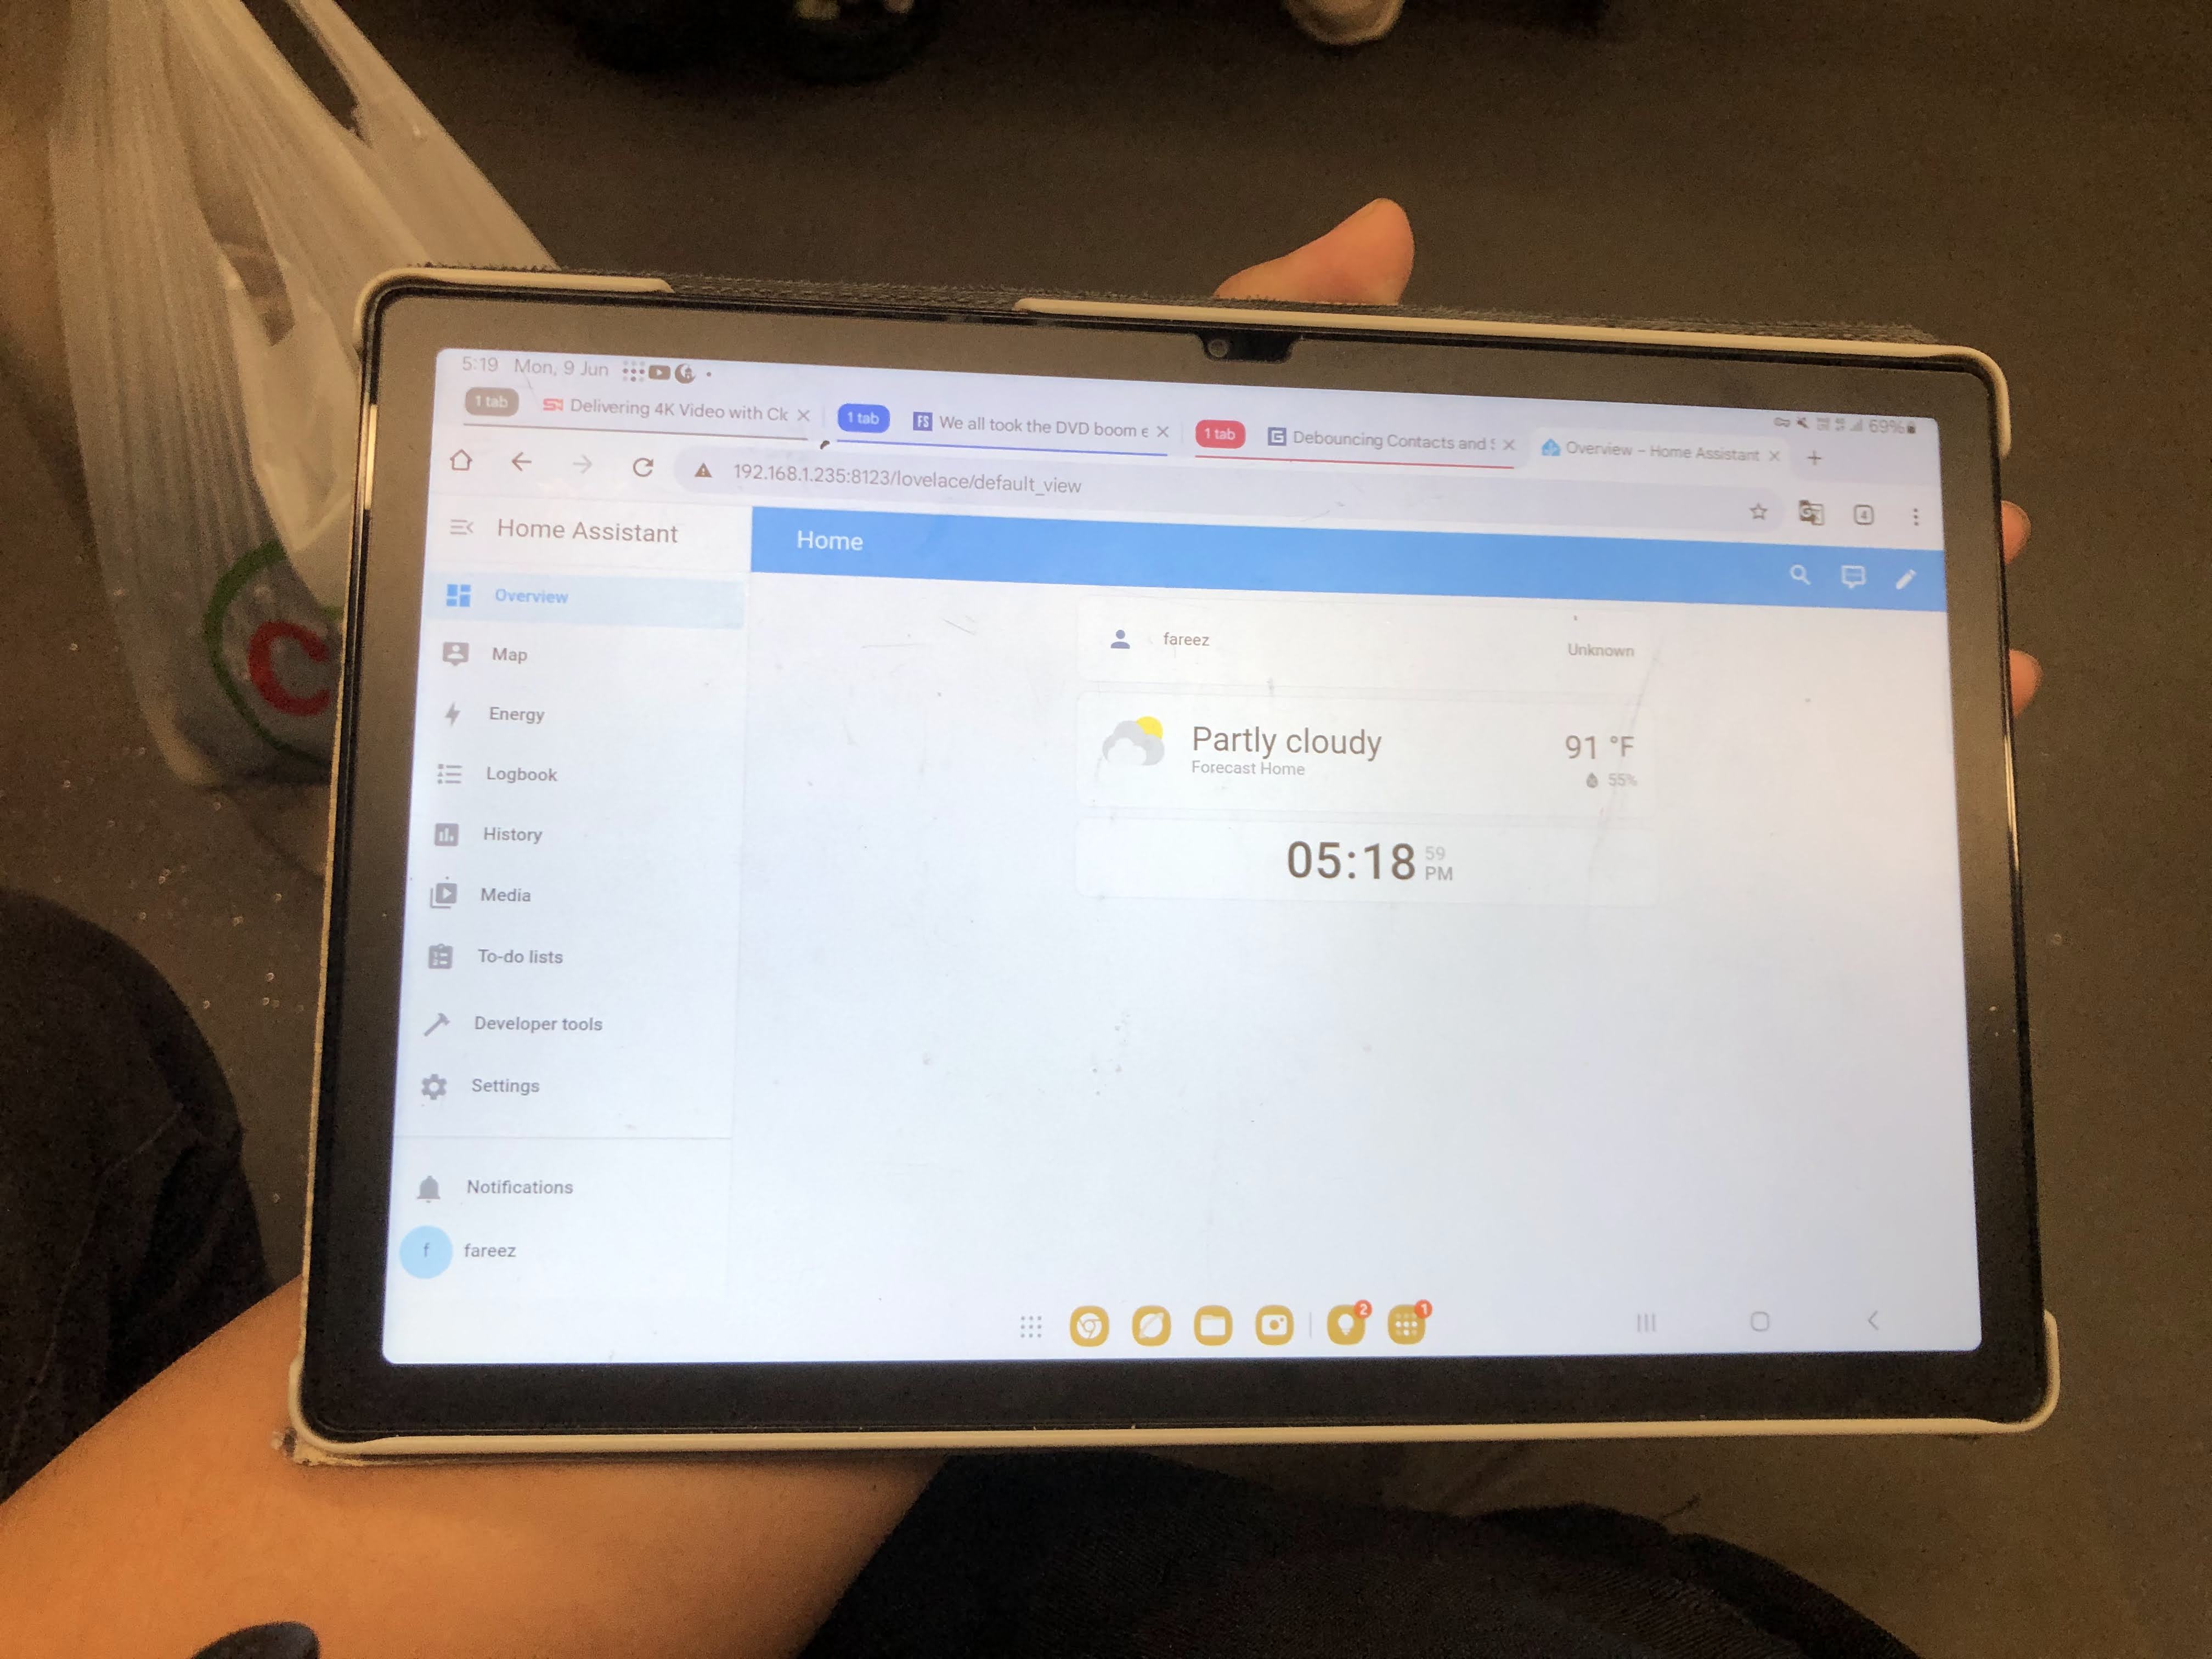
But chop chop... I realized I can't use the hostname to reach Home Assistant. See, when I'm home, I'll access Home Assistant via http://homeassistant.local:8123. But when using Tailscale, I can't do that. After reading a few forums online, it turns out that mDNS is not supported by Tailscale, or any VPN provider. Tailscale has an open issue tracking this topic. Fortunately, we can still access the service normally by its IP address instead.
Someone on Reddit said:
Multicast UDP does not work across VPNs in general, and that includes Tailscale. Anything that depends on multicast UDP, such as mDNS, isn't going to work.
How do you get the IP address, you may ask? From the console of the VM or LXC container! For Home Assistant, you can run the command network info. For other services, you can run ip a.

Conclusion
With this setup, you can securely access your Proxmox environment and home network from anywhere in the world. Remember to regularly update both your container and Tailscale installation to maintain security and performance.
Happy homelabbing! 🚀