- Published on
- Published on
- (Last revised
Deploy Node-RED flows to the Cloud (Azure)
- Authors

- Name
- Muhammad Fareez Iqmal
- @iqfareez
In this tutorial, we will deploy Node-RED flows we've created before to the cloud using Microsoft Azure. By hosting our Node-RED flows in the cloud, we can control remotely and access the data from anywhere. This guide will take you step-by-step through the process of deploying your Node-RED flows to Azure, and provide you with the knowledge and skills to start building your own cloud-based IoT solutions.
Prerequisites
- SSH Client - Eg: PuTTY
- Microsoft Azure account
tip
If possible, register for the Azure account as student to claim the free $100 credit.
Create a new Virtual Machine (VM) instance
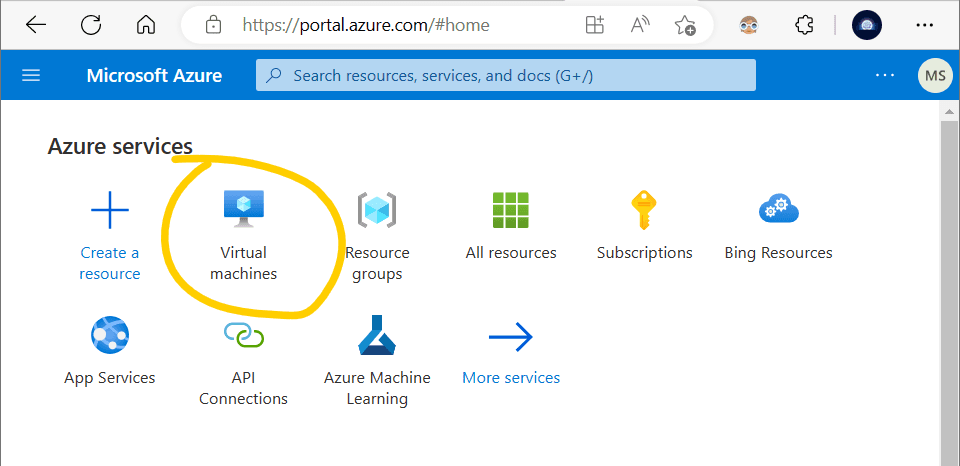
A virtual machine is basically a computer that lives in Azure infrastructure. Open Azure portal and click on Virtual Machine.
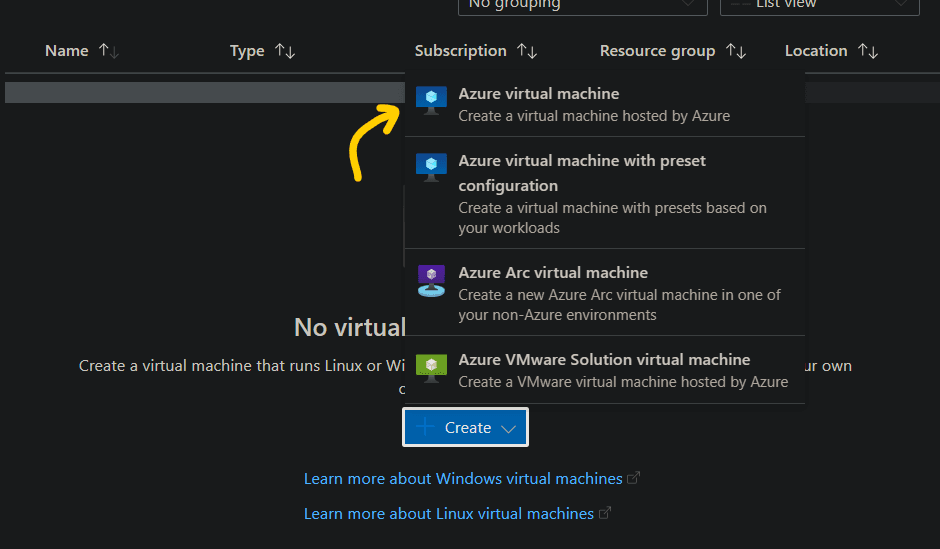
Click on Create > Azure virtual machine on the dropdown menu.
In the Create a virtual machine form, fill in the particulars. Below are some important info you need to fill.
| Item | Description |
|---|---|
| Resource group | Create new or select existing resources |
| Virtual machine name | Give any name. Eg: my-node-red-vm |
| Image | Ubuntu Server 20.04 LTS (Ubuntu 18.04 will cause some issues when installing node) 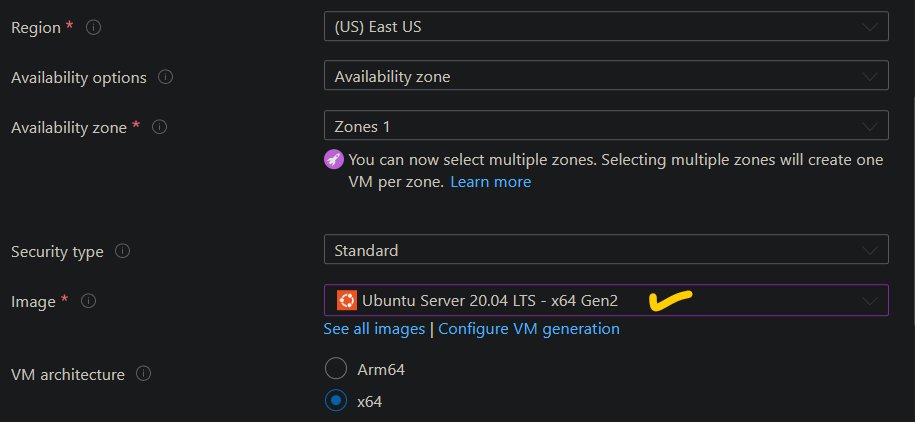 |
| Size | The docs suggest A1 Basic, but I couldn't find it. So, I'll go with Standard_B1s. Keep in mind that Node.js operates on a single thread, so having multiple cores in a Node-RED instance will not bring any advantage. 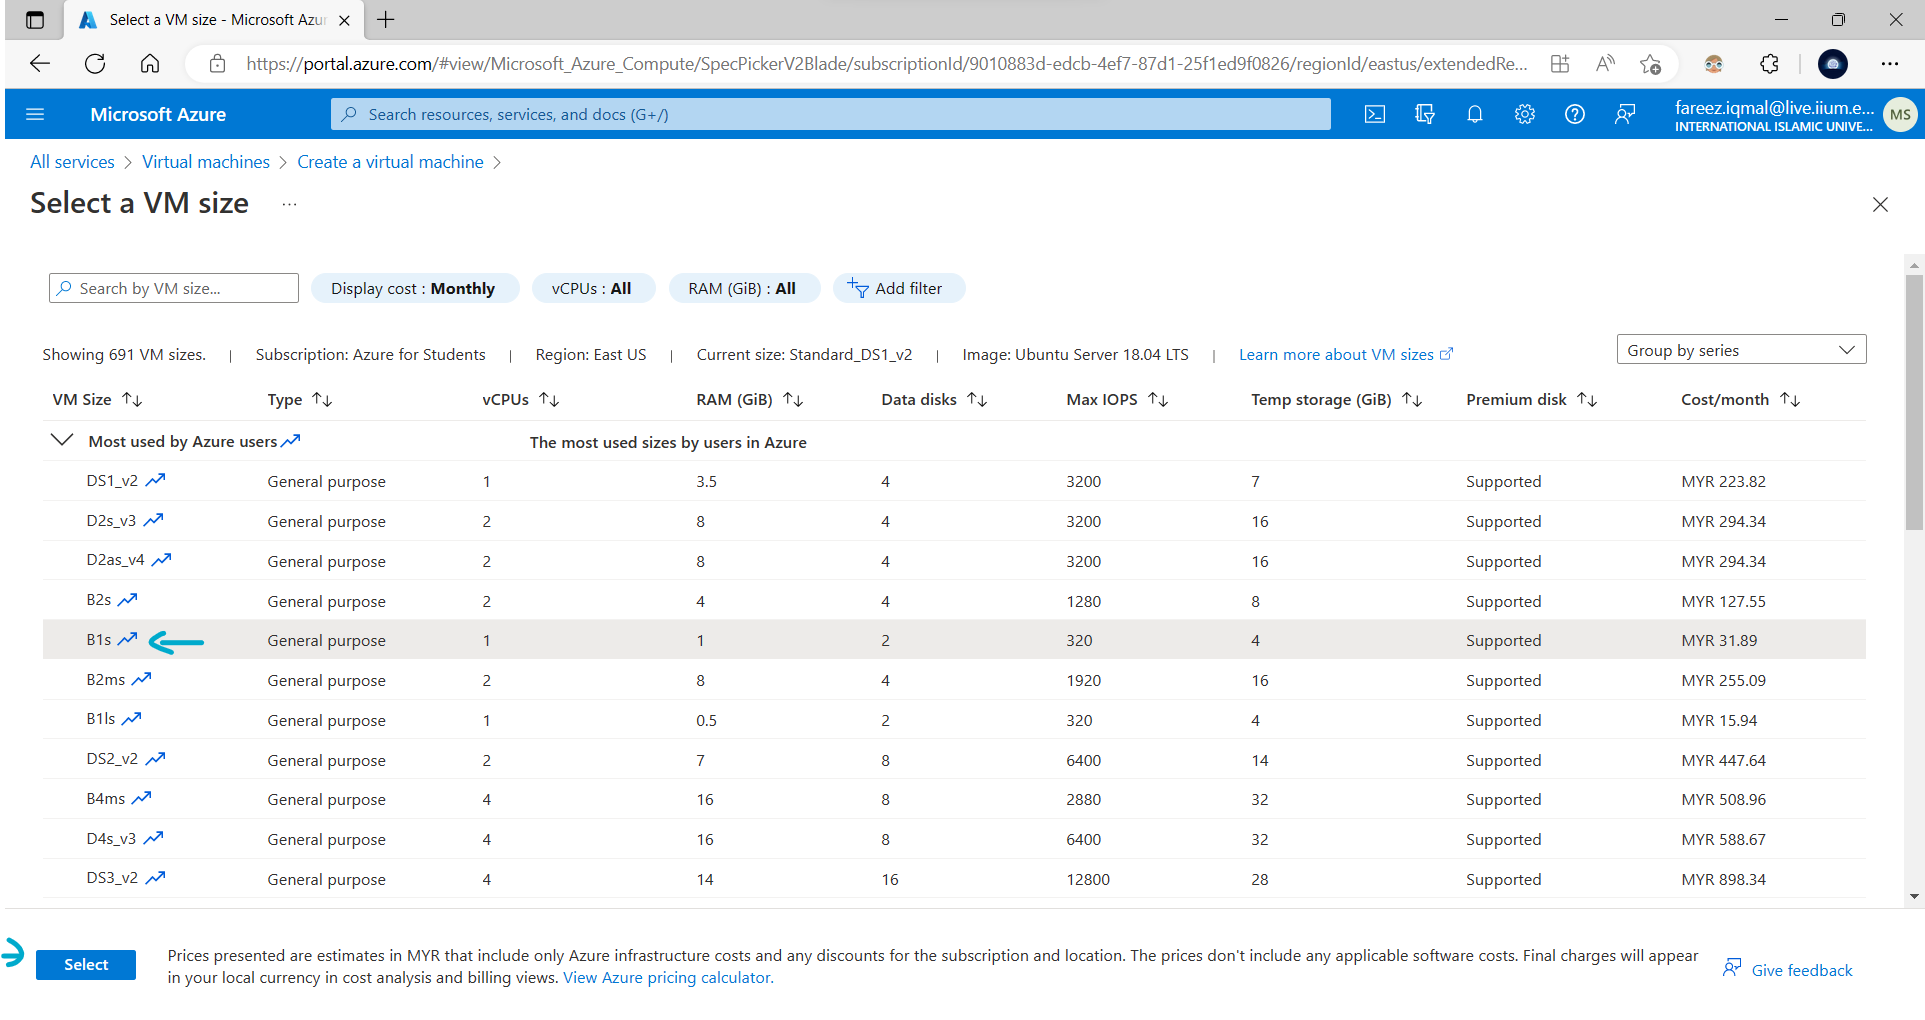 |
| Administrator account | You can leave it as default 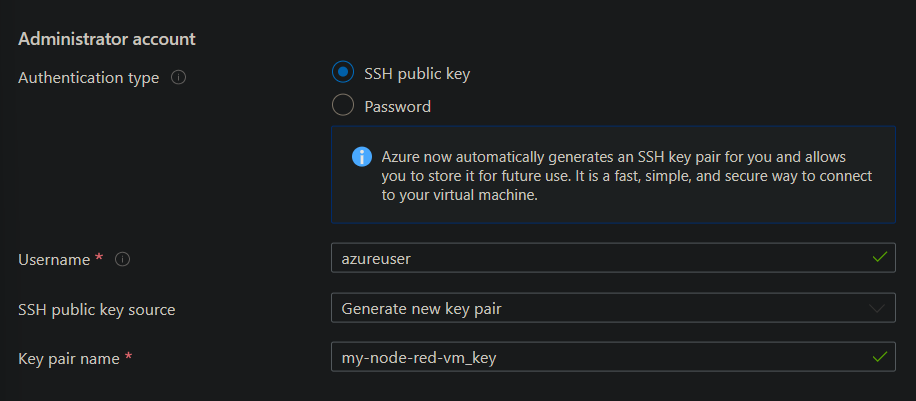 |
| Inbound port rules | Leave it as default 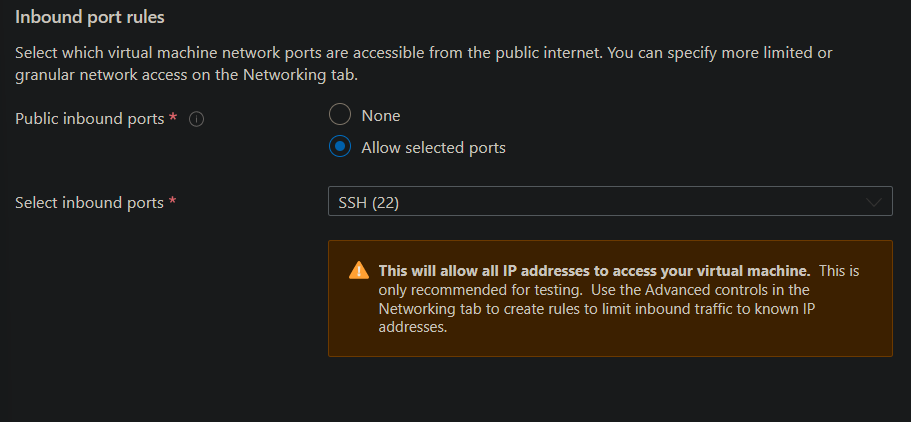 |
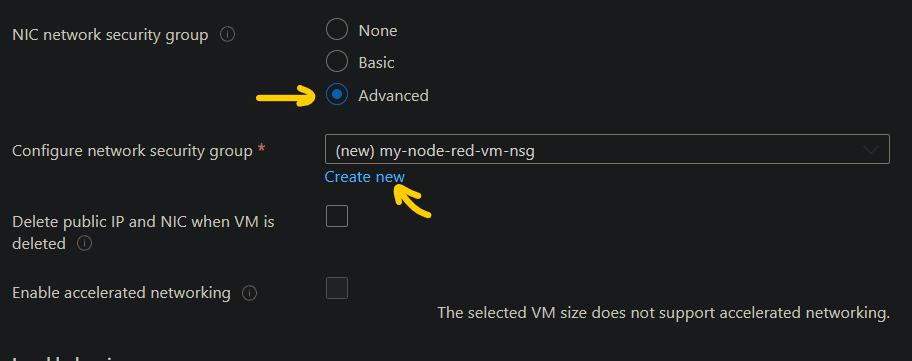
Next, go to the Networking tab.

In the NIC network security group, change the option from Basic to Advanced. Then, in the Configure network security group, click on Create new.
Click on + Add an inbound rule. Set the value as follows:
| Item | Values |
|---|---|
| Destination port ranges | 1880 |
| Protocol | TCP |
| Priority | 1010 |
| Name | Any name. Eg: node-red-editor |
Click Add. You should see your new rule is added to the Inbound rules. Click on OK.
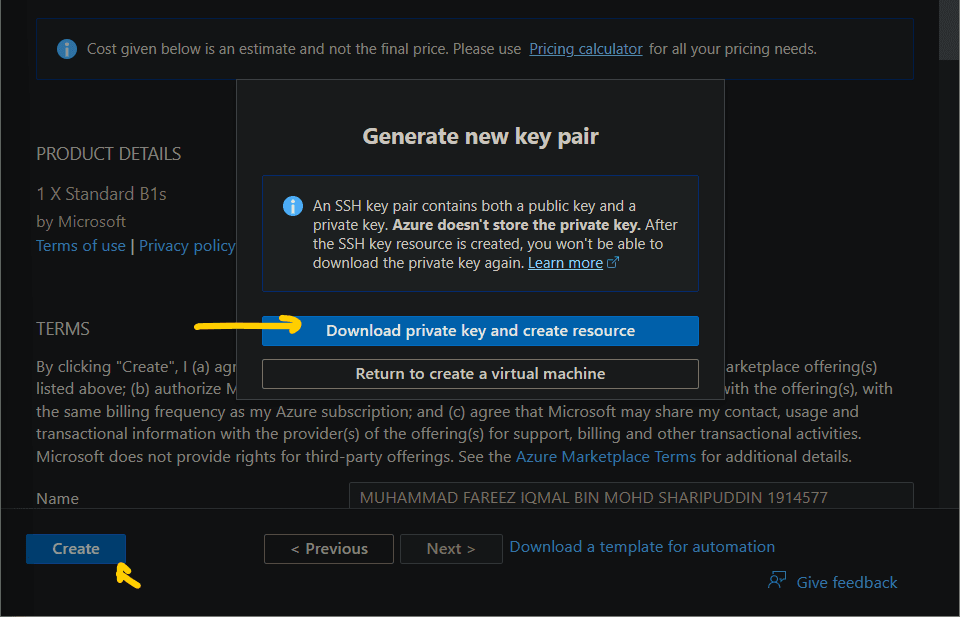
Then, click on Review + create to finalize your VM creation.

It will take a moment to validate the information. Once it's done, click on Create. A dialog Generate new key pair should pop out to let you download your private key. Go ahead and click on the Download private key and create resources.
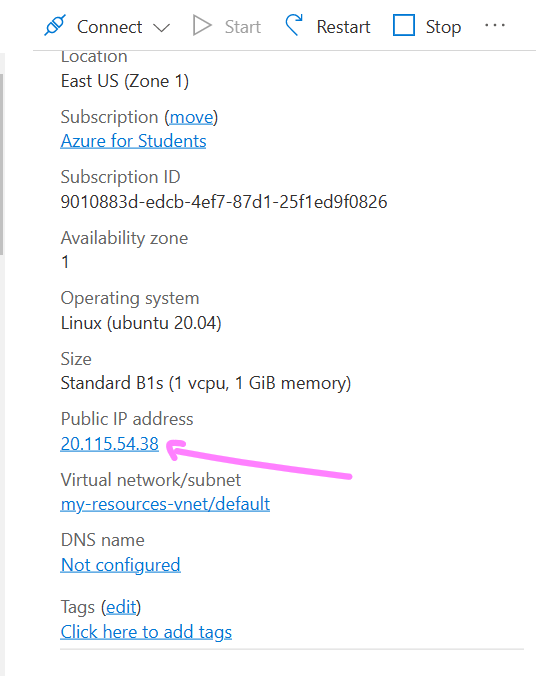
A .pem file will be downloaded, and the Azure deployment worker will start kicking in to start your VM deployment. You can see the progress from the notification panel. Once it's done, click on Go to resource to view your freshly created VM.
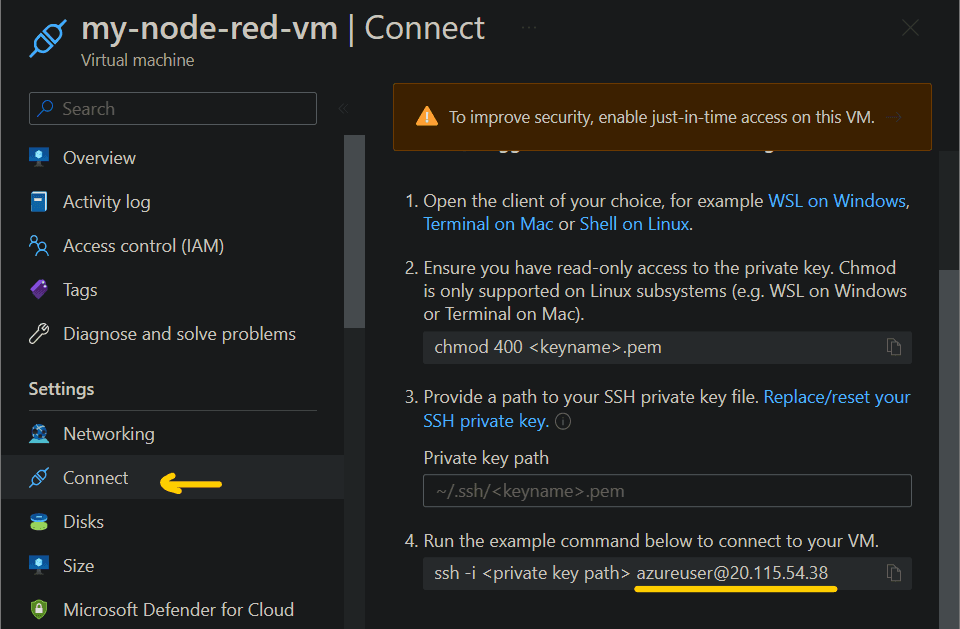
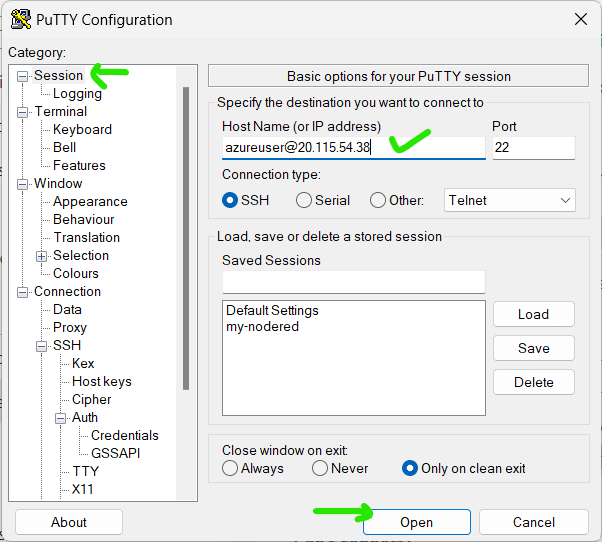
Then, go to Connect, and copy the <username>@<public ip address> from the example command. For example, mine is azureuser@20.115.54.38.
Accessing your VM's Shell
Key conversion
note
As soon as I finish writing this tutorial, I realized that you can connect to the VM's shell by just using PowerShell on Windows (on Linux/MacOS, I know they have CLI ssh). Demo video here.
We'll be using PuTTY to access your VM. But, first, we are first going to convert the downloaded .pem file into something that PuTTY can understand. Open PuTTYgen to get started.
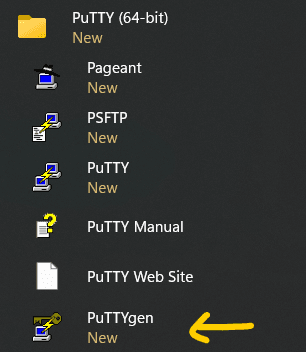
In the PuTTYgen window, click on Conversion > Import key. Import the .pem file we've downloaded from the Azure portal before. PuTTYgen should be able to read it.
Then, click Save private key.
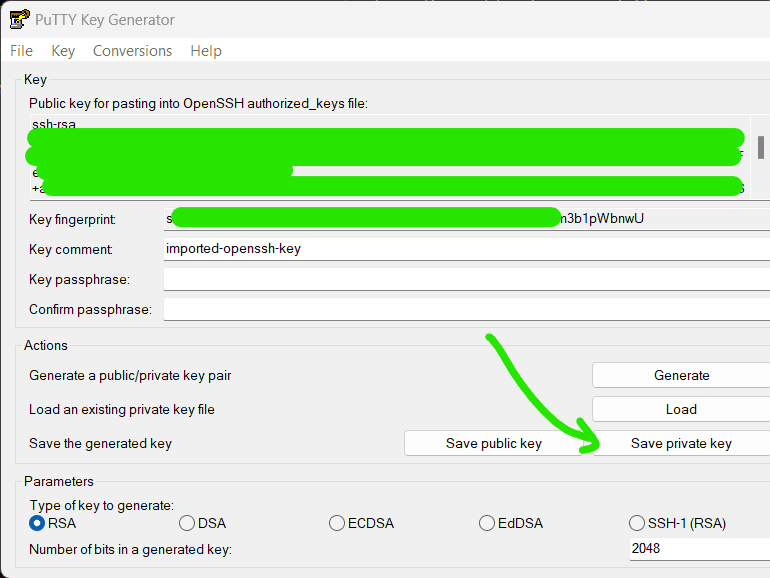
A warning dialog may appear, just click Yes to proceed. Save it anywhere on your computer. Note that the converted file will be saved as .ppk.
You can now close PuTTYgen.
Establishing connection
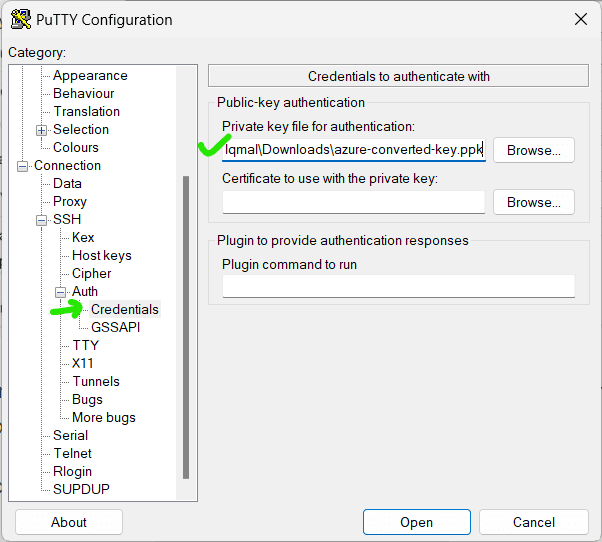
Now, open the main PuTTY app. Click on Connection > SSH > Auth > Credentials.
In the Private key file for authentication, browse the generated .ppk file we've generated before.
note
It is also possible to generate the key pair using PuTTY, and then give your public key to the VM. Read more here.
Go back to Session, in the Host name textbox, paste the <username>@<public ip address> that we've copied from the Azure portal before. Leave other settings as default and click on Open.
A warning dialog might appear, click on Accept to proceed.
tip
You may want to save the PuTTY session, so next time you want to access the Shell, just load the session from the disk
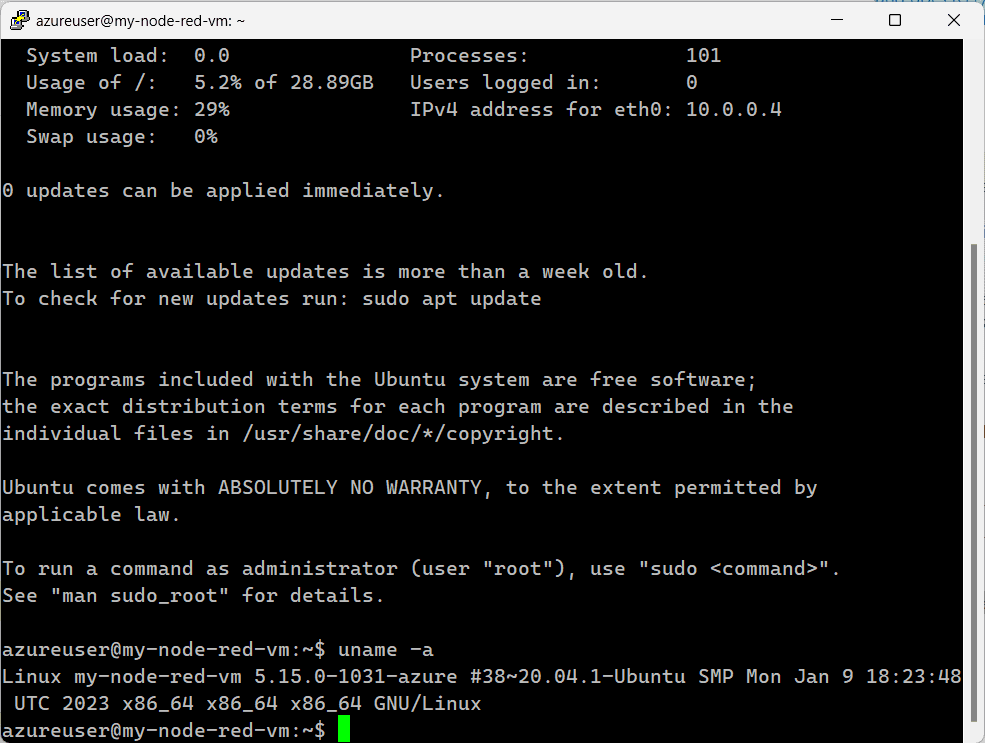
PuTTY will connect you to the Azure VM. Within a few seconds, BOOM! 💥. We've gained access to our VM's Shell. Congratulations, you are now a hacker.
You can verify it by typing the command uname -a to get the OS information.
Install Node-RED
First, install the recommended version of Node on the machine.
curl -sL https://deb.nodesource.com/setup_16.x | sudo -E bash -
sudo apt-get install -y nodejs build-essential
Then, install Node-RED
sudo npm install -g --unsafe-perm node-red
Open Node-RED
Now, Node-RED is ready to be started. Run:
node-red
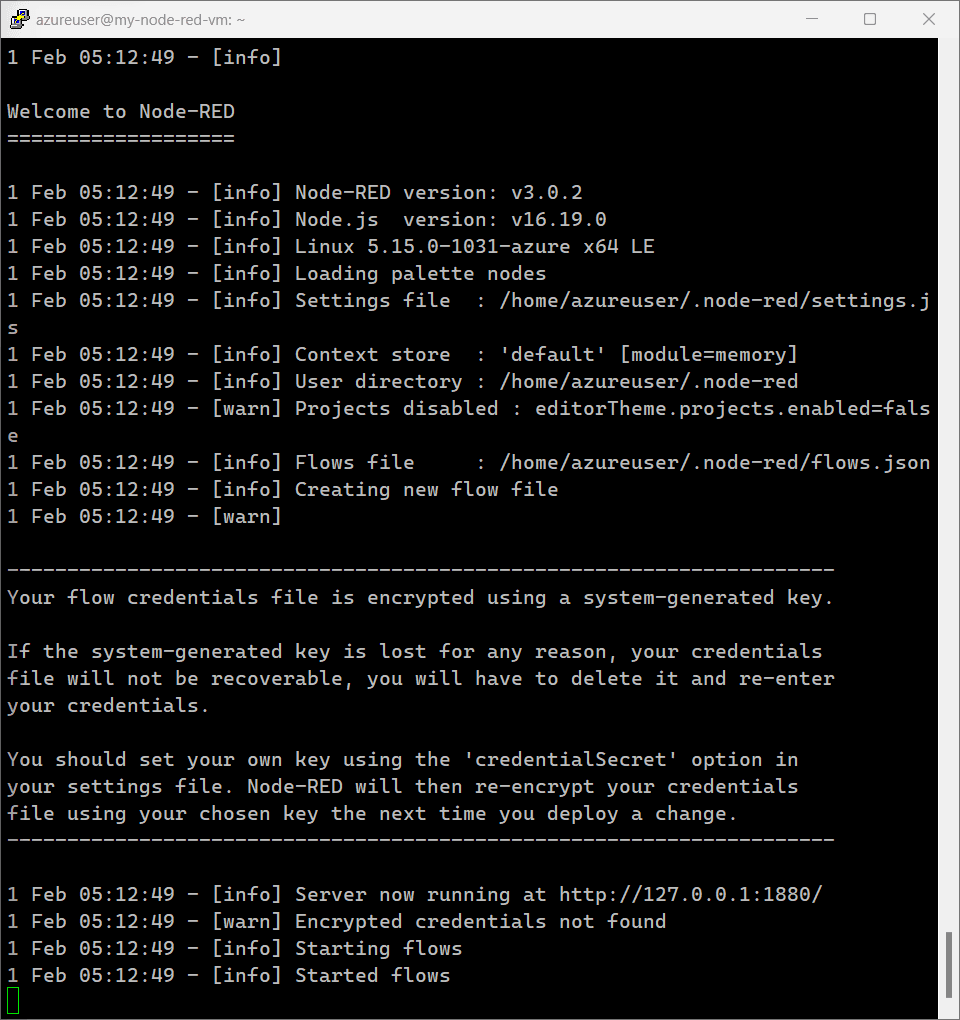
After it has been started, open your browser and go to <public ip address>:1880. For example, mine is 20.115.54.38:1880.
With that, you now have the Node-RED running on your Azure cloud infrastructure 🎉.
At this point, you already can start to design your flows and can deploy instantly in the cloud. But, if you already have developed flows before this locally, why not just import the flows to the Azure VM? Continue reading...
Import existing flows to Node-RED
Before we proceed, let's define:
- Local Node-RED: Node-RED instance that we run on our local machine
- Cloud Node-RED: Node-RED instance that we've just deployed to the Azure VM
note
The steps outlined here are similar to when you want to transfer the Node-RED flows from one machine to another
We can create new flows, but in this article, I will reuse the flows.json that we have created from the previous article.
Then, we'll need to list out the palettes used in the current flows because we'll need to install them. So, on the Local Node-RED > Menu > Manage Palettes. Take notes of the installed palettes. In my case, I only have one additional palette: node-red-dashboard.
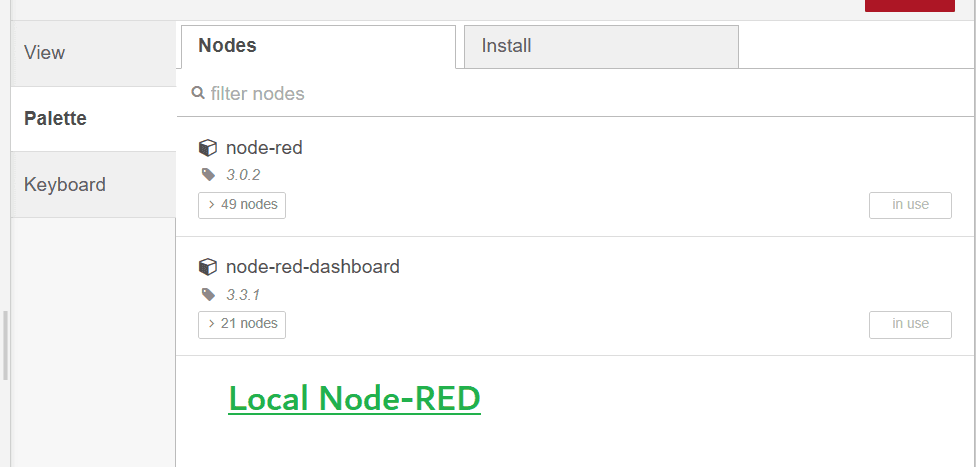
Now, back to Cloud Node-RED, click on Menu > Manage Palettes > Install to install all palettes you need.
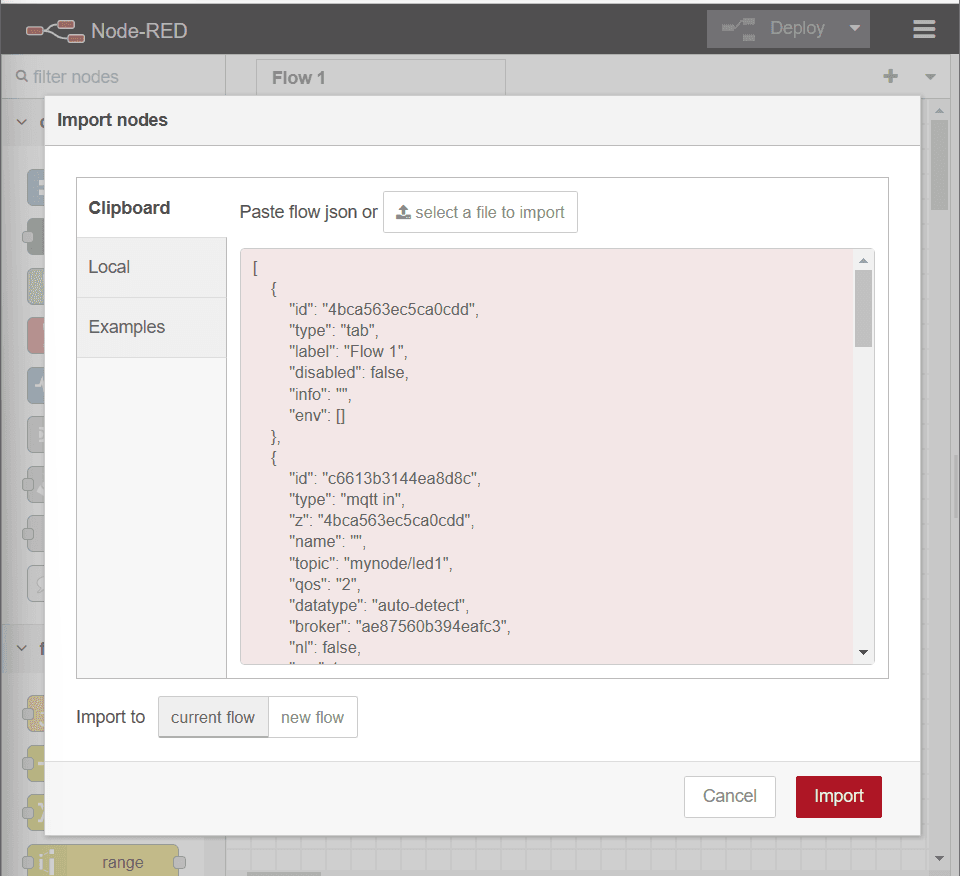
Then, click on Menu > Import. You can paste the JSON content or import the .json file. Then, click on Import.
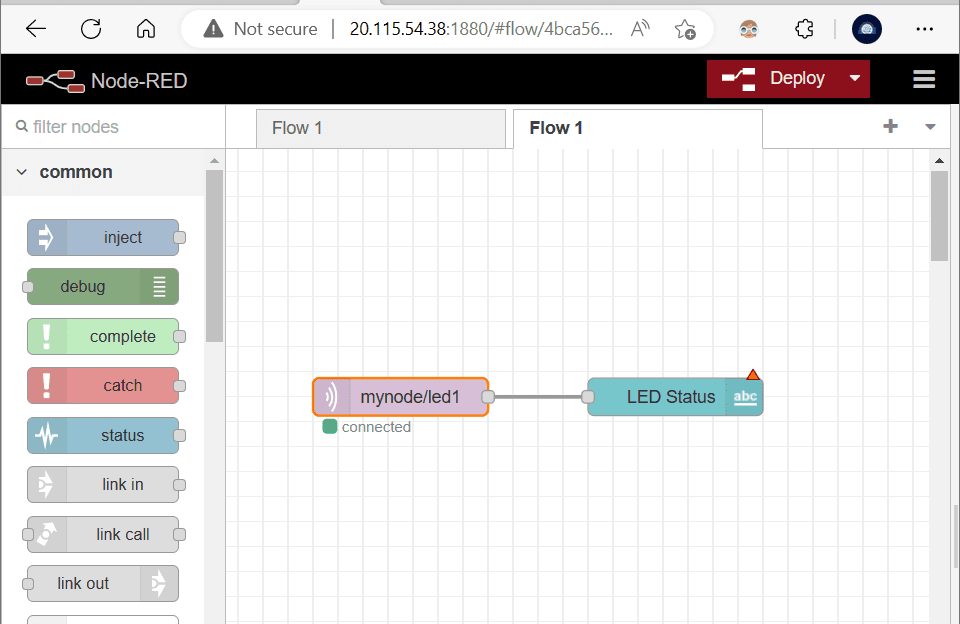
The imported flow will look the same as your local Node-RED's flow.
Finally, hit Deploy to save and deploy the flows.
Open the dashboard UI, connect ESP32 like we did before and the result is something similar below:
Notice that there are a few milliseconds delay between ESP32 and the Node-RED dashboard. Perhaps because we are using a free public mqtt broker, so the connection speed is throttled.
shameless plug
I made the Serial Monitor application that you see above. It is called SeriLink. Learn more here.
Concluding remarks
That's it. You now can continue to develop your flow on the cloud and deploy it right away so that you, or anyone can access it. The process is long, but easy to understand, right? 😉
Remember to watch out for your Azure usages & quotas to avoid extra charges.
You may ask, how do I want to do something similar like this using AWS? IMO, the process may be similar here and there. Just try that out. If I have time, I want to make a YouTube tutorial InshaAllah.